Search This Blog

Friday, July 13, 2012

Bed frame out of a box spring

We've been sleeping on a mattress on the floor for the past several years since we had kids because we co-sleep.  We bought a king size mattress a year ago when we moved to NC, but never bothered to buy a box spring or frame since we didn't want the kids rolling off the bed.  But now they're older, Wyatt is sleeping in his own bed, and we're hoping to transition Emma to her own bed soon as well.  So it was definitely time to get a frame and reclaim our king size bed as our own.

Inspiration for bed frame out of a box spring

I have been searching for a king size box spring since I saw this pin.  It was going to cost me $200+ for a new one, and then I was going to have to find a way to transport it as well, so I turned to craigslist.  Yesterday was my lucky day, and I saw a curb alert for a free king size split box spring.  I immediately called upon my good friend Nicole, who has a van she let me borrow.  I drove right over and loaded up the box spring (which was in surprisingly good condition).  Today I went out and got my materials and, within an hour, had a new frame for our bed!

Materials:
  • box spring
  • legs ( I bought 6" wooden legs from Lowe's for $4 a piece and needed 9 to support the king size frame.  Depending on your mattress size, you could probably get away less or cheaper ones)
  • top plates to install legs (these were $1.93 at Lowe's and you need one for each leg you'll install on the box spring)
  • bed skirt
  • ped pins
  • a drill
We already had a drill and our free box spring, so I just had to run to Lowe's for the legs and top plates and then went to Target for a cheap bed skirt and pins.  I didn't shop around or use coupons or I may have been able to do this project for cheaper, but as it was it wasn't terribly expensive and certainly cheaper than buying a king size frame!

These are the top plates and legs I choose for our frame.
 Once I had everything home, I set the box spring upside down on the floor.  Because I was working with a king size split box spring, I had to line the two box springs up and used the top plates to hold the springs together. 

I placed 3 top plates along the two frames to hold them together, spacing them equally and screwing them in with one side of the plate on one box spring and the other side of the plate on the other box spring so they now are held together as one big box spring.  I also installed 3 top plates on each side of the box spring, so there were 8 legs around the edge of the box spring and one in the very middle to support the huge frame. 

The installed top plates with leg screwed in.
Once the top plates were screwed in (which I managed to do by myself with 2 toddlers running around in under 30 minutes), I just screwed the legs right into the top plates.  It was seriously easy installation.  Emma actually went on my back in the Ergo and fell asleep for her nap while I was finishing the project.

After all the legs were on, which only took a few minutes to accomplish, I carefully flipped the box spring over and laid the bed skirt on top.


I'm not overly impressed with the bed skirt I picked, but it was cheap and does the trick for now.  I pinned it in place, then put the mattress on our new frame. 

It turned out beautifully over all though!  Not only does it look 100 times better than the mattress on the floor, but it's SO much more comfortable sleeping on the box spring.  Complete win all around!

Wyatt approves
Total cost: Since I got the free box spring and had the drill, all I paid for was the bed skirt, pins, legs and top plates.  Grand total of about $60, although the cost would vary depending on the size of the frame and amount of legs needed.
Total time: Just installing the top plates and legs and placing the bed skirt took about an hour.
End result: I'm loving it!

Wednesday, July 4, 2012

Magnets

Because I made this sweet Magnet board, I felt compelled to make awesome homemade magnets to go with it.  This was very easy and turned out cute and the kids enjoy them.

Materials:
  • Sticky back magnetic buttons or magnetic sheets you can cut into the proper sizes
  • Any random buttons, googly eyes, jewels or other trinkets to make into magnets
  • Superglue (optional)

Magnetic buttons, jewels, and superglue
Close up on some of the different magnets we made

These take no time at all to make, and you can get really creative with what you turn into magnets.  We used some big buttons, plastic jewels, and googly eyes, all of which I had already in my craft box.  Each of which you can buy at a craft store for a few dollars for a package with dozens of trinkets.  The magnet buttons are about $3 for a package of 18.  Or you can buy the strips of magnetic tape and use superglue to stick your trinkets onto it.  We ended up with about 50 magnets for about $10.

All you do is stick your trinkets onto the magnetic buttons, and you have unique, cute magnets to stick on your magnet board or fridge!

Emma plays with her magnets and board

I also bought a little magnetic tray from Target for $3 to store all the kids magnets.  And there are magnetic numbers and letters that I bought from the dollar store as well, which is always a good investment (each pack was $1 for 26 magnets).

All in all, we have some really cute accessories for our magnet boards!
Magnet board with all of our different magnets and accessories.

Sunday, July 1, 2012

Magnet Board

I just finished a fun project for the kids, that could also be very useful around the house as well.

Inspiration for Magnet Board

I liked this because I wanted the kids to have a fun place to play with magnets in the playroom, and thought it was neat to decorate the magnet board with whatever fabric you like.  This also turned out to be cheaper than buying an assembled magnet board/white board from Target.  The same size magnetic whiteboard at Target was $12.99 per board.  I made two for $17 and mine are way cuter.

Materials:
  • Piece of sheet metal
  • Fabric large enough to cover the sheet metal
  • Spray adhesive
  • Wall mounts
  • Scissors
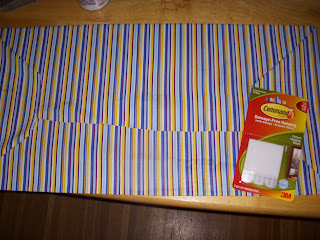
We selected the cheapest sheet metal from Lowe's that fit the space we were looking at.  They were $6 for a 12"x24" sheet.  I bought two.  Just be careful...the sheet metal is very sharp.  I actually cut myself transferring it from the cart to the car.  Once you wrap it in fabric it's fine, but be careful beforehand.  I also picked up wall fasteners from Lowe's since I had a coupon and they were in the same aisle as the sheet metal.  I bought 2 three packs of fasteners that supposedly hold up to 9 lbs of weight and are easy to remove form the wall. 

The fabric we bought on sale at Joanne's.  I picked from the bargain bin, and probably could have made better color/pattern selections, but I had both kids and not a lot of time, so I just grabbed these two patterns, which were $1 per yard.  I ended up only needing a little over .5 a yard of fabric for the sheet metal I purchased, even though I bought 3 times that much.  But better to have too much than too little.

I already had spray adhesive and scissors at home, but the spray adhesive I used is only a few dollars for the whole can, which you only need a small amount of for this project.  Once I had everything home, I got to work!

Wrapping the sheet metal in fabric.
I placed the sheet metal in the fabric and cut it so I had plenty of fabric to cover the sheet metal.  Then I used the spray adhesive to attach the fabric to the metal and pulled it tight.  I only sprayed the back, but the front stayed nicely in place and looked good since I pulled it tight before spraying.
The back of the board with the wall mounts I used to hang it.
After the whole sheet metal was covered, I wrapped it like a present and sprayed it more.  Then I attached the wall mounts to the fabric, also using spray adhesive.

The magnet board mounted on the wall.
I just stuck the wall mounts to the wall where I wanted it mounted and they held up the board perfectly.

And that was it!  A few bucks and a few minutes and I had custom made magnet boards for the kids in the playroom!


Total cost: Between $7-$20 per board, depending on how big the board you want and how much the fabric you use costs.  The total for my two boards that are 12"x24" and covered in the above pictured fabric was $17 (although I already has spray adhesive, so that's not totaled into that cost and I bought most of the materials on sale/with coupons)
Total time: Once I had all the materials, it took me about 10 minutes to make and mount both boards.  We just made them, so I'm not sure how much the kids will use them, but so far they're enjoying them quite a bit!
Result: Pretty sweet!

I'll make a post tomorrow about how we made the awesome magnets and the accessories you can add.

Wyatt is pretty impressed with his board.
Emma plays with the magnets.